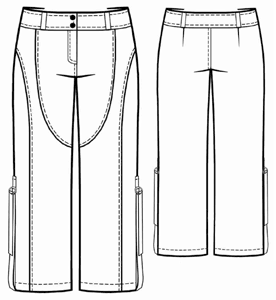
Home / Women / Pants / #5458 Capri with figured reliefs


Difficulty: **
You will need: elastic denim; fusing; 1 zipper; 2 buttons.
Attention! Fabric consumption varies depending on the size of garment. First of all, print out paper patterns and lay them out at the width of fabric/ knit you plan to use, to see how much fabric you will need.
When sewing the garment, pay attention to notches- they must coincide.
Cutting :
Facing:
1. Right front facing - 2 details
2. Left front facing - 2 details
3. Back facing - 2 details
4. Upper front part - 2 details
5. Lower front part - 2 details
6. Side front part - 2 details
7. Back part - 2 details
8. Belt loops - 1 detail
9. Button catch - 1 detail
Fusing: back facing, right/left front facings and button catch.
Instructions:
1. Apply the fusing to wrong side of back facing, right/left front facings and button catch.
2. Sew front part details. Serge and press joining seam. Make decorative stitch at 0.5 cm (3/16") from relive joining seam on front part.
3. Sew back darts. Sew side edges of front/back facings. Press joining seam apart.
4. Serge side edge of back/front parts, inside leg edges of front/back parts, front edge and middle edge of pants. Sew side edges of front part and back part together. Press side seams apart.
5. Sew inside leg seams and press them apart. Sew front edge to back edge up to closure notch. Make another stitch along inside leg seam close to front/middle seam.
6. Press closure one-piece facings to wrong side. Sew the zipper under closure left allowance along the edge. Sew zipper free braid on right one-piece facing. Fold button catch along the center and overstitch lower short edge. Topstitch closure one-piece facing on button catch on pants left part. Topstitch slit right edge catching facing.
7. Lay facing details right sides together and overstitch upper edge. Topstitch overstitching on lower facing at 0.2 cm (1/16") from overstitching, stopping at 3 cm (1-3/16") before end. Fold yokes to wrong side and press them.
8. Fold the loop belt along the center and overstitch at 0.5-0.7 cm (3/16") from edges. Turn the detail right side out, placing seam at fold or make edging of 0.1-0.2 cm width into wrong side, and press.
9. Serge upper edge of lower facings. Cut belt loops of proper size and mark place to sew them. Sew belt loops to facings lower edges. Sew facings to garment upper edge coinciding side seams. Overstitch facing corners. Slash allowances in corners, turn them right side out and press them. Topstitch facing sergeed edge along joining seam.
10. Serge hem allowance and press it to wrong side. Topstitch the hem. Make buttonholes into right facing, sew buttons on left one.
Our advice: if you wish, you can, in according with technical sketch, topstitch leg half-belt with clasp on side seam. Do this before stitching inside leg seams.