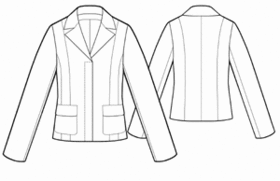
Home / Women / Jackets / #5545 Jacket With Concealed Closure

Difficulty: ***
Recommended fabrics: medium-weight wool or wool blends.
You will need: fusible interfacing; 3 buttons; lining; shoulder pads; stripes of polyfill for sleeve caps.
Attention! Fabric consumption varies depending on the size of garment. First of all, print out paper patterns and lay them out at the width of fabric/ knit you plan to use, to see how much fabric you will need.
When sewing the garment, pay attention to notches- they must coincide.
Cutting:
Shell:
1. Center Back – 2 pieces
2. Side Back – 2 pieces
3. Side Front – 2 pieces
4. Center Front – 2 pieces
5. Middle Front – 2 pieces
6. Front Facing – 2 pieces
7. Lower Collar – 1 pieces
8. Upper Collar – 1 pieces
9. Front Sleeve – 2 pieces
10. Back Sleeve – 2 pieces
11. Pocket – 2 pieces
12. Pocket Flap – 4 pieces
13. Back Neckline Facing – 1 piece
Lining:
1. Center Back – 2 pieces
2. Side Back – 2 pieces
3. Side Front – 2 pieces
4. Center Front – 2 pieces
5. Middle Front – 2 pieces
6. Front Sleeve – 2 pieces
7. Back Sleeve – 2 pieces
8. Concealed Closure Lining – 2 pieces
9. Pocket Lining – 2 pieces
Fusible Interfacing: Front Facing, Upper Collar, Back Neckline Facing, Concealed Closure Lining – 1 piece only, Center Front parts.
Instructions:
1. Reinforce Front Facing, Upper Collar, Back Neckline Facing, Concealed Closure Lining – 1 piece only, Center Front parts with fusible interfacing.
2. Line up Flaps face-to-face and stitch together, around at three outer sides. Clip allowances in corners. Turn the Flap out, press. Line up Collars face-to-face and stitch together, around at three outer sides. Clip allowances in corners. Turn the Flap out, press.
3. Sew Middle Front to Center Front part. Press seam open. Sew Side Front to Middle Front. Press seam open.
4. Mark placement of Pockets at each Front. Line up Pocket lining and Pocket, stitch together at all four sides, leaving an opening about 2” long for turning out. Clip allowances of rounded corners of Pocket. Turn the Pocket out through the opening. Press the Pocket. Apply Pocket onto Front and topstitch. Mark placement of Flap. Apply and stitch Flap onto Front, with raw edges towards the Pocket. Turn the Flap down and topstitch at 0.5 cm (3/16”) from the seam.
5. Mark cut for closure at the face side of right Front Facing with three lines. First line is parallel to front edge, 1.5 cm (3/16”) apart from the front edge. Second and third lines perpendicular to the first one – they limit length of concealed closure.
Line up reinforced Concealed Closure Lining) with Front Facing, face-to-face, matching raw edge of Facing with marked line.
Stitch Concealed Closure Lining onto Front Facing 0.5 cm (3/16”) from the marked line, ending the seam at the second and third mark lines at top and bottom.
Apply second Concealed Closure Lining next to the seam of attaching the first Concealed Closure Lining, stitch at 0.5 cm (3/16”) from the marked line (distance between two seams is now 1.0 cm (3/8”)).
Make sure the two seams are parallel, at the wrong side of Front Facing. Carefully cut Front Facing between the seams, in corners cut diagonally. Pull the facings through the opening into wrong side, forming a frame out of two Concealed Closure Linings.
Stitch in the ditch of seam of Concealed Closure Lining, fastening its inner half. Press second Concealed Closure Lining towards inner edge of Front Facing. Make a topstitching at 0.1 cm (1/16”) from the seam of attaching the Concealed Closure Lining.
Mark buttonholes’ placement. Work buttonholes into Front Facing along with Concealed Closure Linings.
Turn the small triangles at the ends of Concealed Closure inside and stitch across to fasten the triangles.
Staystitch Concealed Closure Linings together. Make bartacks between each pair of buttonholes, with length of bartack equal to width of frame. Press Front Facing.
6. Line up Front Facing with Front face-to-face, pin and stitch along the front edge. You must stitch at Front from the bottom up to the notch for Collar. Stitch bottom of Front Facing to Front with a horizontal seam exactly at the marked hemline. Clip allowances in top and bottom corners of front edges. Understitch front edges: onto Front Facing, at the closure area; onto Front, at the lapels. Turn out front edges, press.
7. Sew center back seam. Sew shoulder and side seams of jacket. Press all seam allowances open.
8. Sew shoulder seams of Back Neckline Facing and Front Facings. Press seams open. Sew Lower Collar into neckline of jacket; sew Upper Collar into neckline of Facings.
9. Sew elbow and front seams of Sleeves; press allowances open. Turn under and press bottom hem of Sleeve.
10. Sew Sleeves into armholes as per notches. Sew shoulder pads and stripes of polyfill to armhole allowances at sleeve caps.
11. Assemble lining pieces, leaving an opening in the right front seam of Sleeve.
12. Sew lining to the inside edges of Front Facings and Back Neckline Facing. Press neckline allowances open. Staystitch together neckline allowances of Upper and Lower Collars, to prevent Collar from distorting.
13. Sew lining to the bottom of jacket and Sleeve bottoms. Turn the jacket out through the Sleeve opening. Stitch to close sleeve opening. Make a topstitching along the Concealed Closure.
14. Mark placement and sew buttons at the left front.