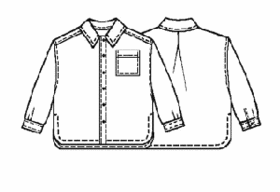
Home / Boys / Shirts / #7023 Shirt


Difficulty: *
Attention! Fabric consumption varies depending on the size of garment. First of all, print out paper patterns and lay them out at the width of fabric/ knit you plan to use, to see how much fabric you will need.
When sewing the garment, pay attention to notches- they must coincide.
Recommended fabrics: cotton fabric for shirts
You will need: Cotton flannel fabric with pattern; 10 cm (4”) of blue cotton fabric 90 cm (36”) wide; 15 cm (6”) of fusible interfacing; 8 white buttons 14 mm (4/8") in diameter.
Cutting:
Patterned Flannel:
Front - 2 pieces
Back - 1 piece
Sleeve - 2 pieces
Collar Stand - 2 pieces
Collar - 1 piece
Pocket - 1 piece
Cuff - 2 pieces
Sleeve Vent Facing - 2 pieces
Blue cotton fabric:
Collar - 1 piece
Pocket Trim - 1 piece
Fusible interfacing is used to reinforce Collar, Collar Stand and half-width of Cuff.
Instructions:
1. Reinforce outer pieces of Collar and Collar Stand (1 piece each) and half-width of each Cuff with fusible interfacing.
2. Fold Pocket Trim piece lengthwise in half, wrong side inside, and press. Turn under and press long raw edges. Encase top of Pocket with Pocket Trim and stitch at bottom of Trim piece to join all the layers.
3. Turn under and press raw edges of Pocket. Place the Pocket onto left Front as per pattern, topstitch.
4. At the wrong side of Back, create a fold at top of center Back and stitch it down. Press the whole pleat to the side.
5. Sew shoulder seams, serge allowances and press them towards Back. Topstitch.
6. Sew Sleeve into armhole, matching the notches. Serge allowances, press towards armhole, topstitch the armhole.
7. Work each sleeve vent. Make a cut at Sleeve as per pattern. Trim the cut with bias Sleeve Vent Facing. Place the Facing onto garment face-to-face, matching raw edges, and attach at the distance of 1/4 of Facing width from raw edge. Turn the Facing over the raw edges; turn under raw edge of Facing (1/4 of Facing width), baste. Stitch in the ditch fastening the bottom of Facing.
8. Sew at one go Sleeve and Side seams down to the notch of side vent. Serge allowances; press them open.
9. Create pleats at Sleeve bottom as per notches, press the pleats as directed in pattern, baste raw edges.
10. Assemble Cuffs. Fold each Cuff in half lengthwise face side inside, stitch down short ends. Clip the corners, turn out the Cuff. Place reinforced half of Cuff face to face with bottom of Sleeve, stitch together. Press allowances inside the Cuff, topstitch along the seam. Turn under and press raw edge of Cuff, and stitch in the ditch along the previous seam. Proceed to make a topstitching around the Cuff (except already topstitched side).
11. Turn to the wrong side and press extended Front Facing. Turn under long raw edge and topstitch it to Front. Topstitch center front edge as well.
12. Turn under and press bottom hem allowance and side vent allowances. Turn under raw edges, press and topstitch the bottom and side vents.
13. Assemble Collar with Collar Stand. Place Collar pieces face-to-face and stitch around the outer edges. Clip allowances in corners, turn out the Collar, press and topstitch. Place Collar Stand pieces face-to-face, encasing Collar between the notches (match reinforced pieces of Collar and Collar Stand), and stitch the top edge of Collar Stand. Turn out the Collar. Turn inside and press raw edges of Collar Stand. Encase neckline of shirt between the bottoms of Collar Stands, stitch all layers together. Proceed with topstitching all around the Collar Stand.
14. Make buttonholes into Cuffs, Collar Stand and Left Front according to pattern.
15. Sew buttons accordingly.