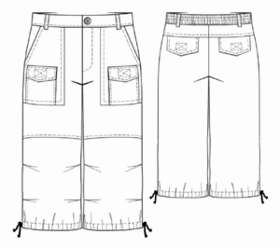
Home / Boys / Pants / #7085 Capri

Difficulty: **
You will need: natural/mixed fabrics; fusing; 1 zipper; 1 button; Velcro; decorative braid; 2 fixers.
Attention! Fabric consumption varies depending on the size of garment. First of all, print out paper patterns and lay them out at the width of fabric/ knit you plan to use, to see how much fabric you will need.
When sewing the garment, pay attention to notches- they must coincide.
Cutting
Fabric:
1. Waistband - 1 detail
2. Yoke - 2 details
3. Back part - 2 details
4. Upper front part - 2 details
5. Lower front part - 2 details
6. Upper pocket - 2 details
7. Belt loops - 1 detail
8. Back pocket flap - 4 details
9. Small patch pocket - 1 detail
10. Small pocket flap - 2 details
11. Button catch - 1 detail
Fusing: waistband, button catch, flap details, pocket entrance allowance.
Instructions
1. Apply the fusing to wrong side of waistband, button catch, flap details, pocket entrance allowance.
2. Lay flap details right sides together and overstitch them. Cut allowances in flap corners and turn them right side out. Topstitch along flap outer contour at 0.5 cm (3/16") from edge and serge flap upper edge. Topstitch fiber Velcro part on flaps according to marks.
3. Press small patch pocket's upper edge into wrong side, fold it under and topstitch. Press pocket lower/side edges into wrong side according to pattern. Press hooked Velcro part accordingly to flap. Topstitch the pocket on upper pocket according to marks. Stitch small pocket's flap on upper pocket. Press the flap downwards and topstitch near joining seam.
4. Serge upper patch pocket's edges: side long edge, pocket entrance edge and lower edge. Press sergeed allowances according to pattern. Topstitch pocket entrance allowance at 0.5 cm from edge.
5. Mark front pocket on front part and topstitch pocket side/lower edges at 0.2 cm (1/16") from pocket outer edge, leaving pocket entrance unstitches.
6. Stitch to yoke to back part inserting the flap between them. Serge the joining seam and press it towards the yoke. Topstitch along joining seam at 0.5 cm from the seam. Topstitch hooked segments of Velcro on back part according to flap.
7. Stitch upper front part and lower front part together. Press the seam upwards and topstitch along the seam. Make pleats into lower front part.
8. Serge front/middle edges of garment parts and garment lower edges (hems). Stitch inside leg seams and serge them, press backwards. Stitch side seams to the mark, press them apart and serge. Stitch front edges together; stitch middle edge up to closure notch. Make another stitch along crotch seam near the seam joining front seam and middle seam.
9. Press closure one-piece facings into wrong side. Stitch the zipper edges closure left edge. Stitch zipper free braid to fight one-piece facing. Fold button catch along the center and overstitch lower short edge. Topstitch closure one-piece facing on zipper on left button catch. Topstitch slit right edge catching the facing.
10. Fold belt loop along the center wrong side out, adjust edges and overstitch at 0.5-0.7 cm (3/16") from edges. Then turn it right side out, placing the seam along fold line or making an edging of 0.1-0.2 cm (1/16") - with into wrong side, and press.
11. Press the waistband along the center right side out and serge lower inner edge of it. Cut belt loops according to size and topstitch them on garment upper edge.
12. Stitch the waistband to garment upper edge. Overstitch waistband ends, cut corner allowances and turn the waistband right side out. Topstitch waistband lower sergeed edge on joining seam and press ready waistband.
13. Press hem allowance into wrong side and topstitch it. Pull decorative stitch into this coulisse and fix it with fixers.
14. Make buttonhole into waistband right end, sew buttons on left one.