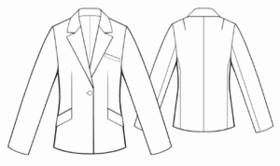
Home / Women / Jackets / #5437 Jacket

Difficulty: ***
You will need: wool or semi-wool, fusing, 1 button, lining, shoulder pad, sleeve heads.
Attention! Fabric consumption varies depending on the size of garment. First of all, print out paper patterns and lay them out at the width of fabric/ knit you plan to use, to see how much fabric you will need.
When sewing the garment, pay attention to notches- they must coincide.
Cutting:
Fabric:
1. Inner collar - 1 detail
2. Outer collar - 1 detail
3. Front part - 2 details
4. Pocket detail - 1 detail
5. Flap - 4 details
6. Front facing - 2 details
7. Back neckline facing - 1 detail
8. Side part - 2 details
9. Back part - 2 details
10. Upper sleeve - 2 details
11. Lower sleeve - 2 details
Lining:
1. Front part - 2 details
2. Side part - 2 details
3. Back part - 2 details
4. Pocket bag - 4 details
5. Upper sleeve - 2 details
6. Lower sleeve - 2 details
Fusing: front facing, flap, pocket detail, front part, sleeve hem and garment hem, back neckline facing.
Instructions:
1. Apply the fusing to wrong side of front facing, flap, pocket detail, front part, hems, back neckline facing.
2. Sew back darts and press them towards back center. Sew front darts and slash depths. Cut pocket entrance.
3. Fold pocket detail along the center wrong side out and press it. Serge corners of pocket detail, cut extra fabric in corners and turn the pocket detail right side out. Press ready pocket detail. Mark bust pocket's place. Sew the pocket detail to front part, turn it upwards and topstitch along sides.
4. Lay flaps on lining flaps, right sides together, and overstitch. Slash flap corners allowances and turn them right side out. Lay outer collar on inner collar and topstitch. Press seams.
5. Cut facings of slip side pocket. Tack pocket entrance. Press pocket facings along the center, wrong side inside. Mark auxiliary line on pocket facing, which is parallel to stitch bend of facing. Mark auxiliary line, which is parallel flap upper edge and measuring flap width, on flap. Mark auxiliary lines which are parallel to pocket entrance (for sewing the flap and pocket facings. Sew flap pocket bag to flap. Sew facings to front part (stop stitching near parallel pocket markings). Stitches must be parallel to each other. Cut pocket entrance. Make diagonal notches at 1-1.5 cm (5/8") from pocket end. Turn facings right side out through this slit; place pressed bend of facings line-on-line. Fix pocket ends with double reverse stitch at corner bases. Sew pocket bag to flap. Insert the flap into pocket and sew it to pocket outer facing. Sew inner pocket bag along seam joining inner facing, slash and sew pocket bag.
6. Pin front facing to front part right sides together, and overstitch along edging (at front part side up to the notch pointing end of collar sewing in). Sew lower edges of front facings to front part, strictly along hem line. Slash seams of upper/lower front facing corners. Topstitch allowance of front facing overstitching: at closure - on front facing, and lapels - on front part band. Stitch at 0.2 cm (1/16") from seam. Turn edgings right side out.
7. Sew back middle seam and press it apart. Sew font and back princess seams and press them apart. Sew side/shoulder edges and press them apart.
8. Sew shoulder edges of facing of back neckline and front facing, then press apart. Sew inner collar into neckline, sew outer collar into edge of back neckline facing.
9. Sew sleeve elbow seam and press it apart. Sew sleeve front seam and press it apart. Press sleeve hems under.
10. Sew sleeves into armholes coinciding notches. Sew shoulder pads and sleeve heads.
11. Sew lining details and sew lining sleeves in, with a slit in front right seam of a sleeve.
12. Sew lining to inner edges of front facing and back neckline facing. Press joining seam allowances apart and fix near seams.
13. Sew the slit into sleeve. Sew the lining to garment hem. Turn the garment right side out through slit in the sleeve.
14. Make a buttonhole into wrote front part and sew the button on left one.