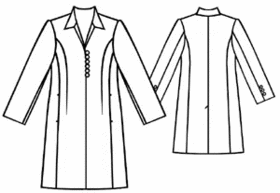
Home / Women / Jackets / #5145 Jacket


Difficulty: ***
You will need: fabric suitable for suits; lining; fusing; 12 buttons; shoulder pads; warmer.
Attention! Fabric consumption varies depending on the size of garment. First of all, print out paper patterns and lay them out at the width of fabric/ knit you plan to use, to see how much fabric you will need.
When sewing the garment, pay attention to notches- they must coincide.
Cutting:
Fabric:
1. Front middle part -2 pieces
2. Side front part -2 pieces
3. Middle back part -2 pieces
4. Side back part -2 pieces
5. Upper sleeve -2 pieces
6. Elbow part -2 pieces
7. Collar - 2 folded pieces
8. Back neckline facing - 1 folded piece
9. Pocket bag - 4 pieces
10. Front facing - 2 pieces
Lining:
front part (excluding front facing's width)
back part (excluding neckline facing's width
without vent allowance and with a pleat of 2 cm (3/4") width along middle line)
side front part
side back part
upper sleeve
elbow part.
Fusing: front facings, back neckline facing, collar, vent, middle front parts.
Instructions:
1. Apply the fusing to wrong side of front facings, back neckline facing, collar, vent, middle front parts.
2. Stitch back middle edges downwards vent mark. Make diagonal notch in corner of seam allowance of right back part. Press seam allowance apart; press vent one-piece facing and vent allowance towards left back part.
3. Stitch back princess seam. Press allowances towards the center.
4. Stitch front princess seam and darts excluding pocket entrance. Press allowances towards the center.
5. Stitch upper pocket bag to pocket entrance allowance of middle front part, right sides together. Stitch lower pocket bag to pocket entrance allowance of side front part, right sides together. Stitch pocket bags' edges together. Topstitch middle front part along princess seam excluding pocket entrances.
6. Stitch side/shoulder edges.
7. Stitch back neckline facing to front facings.
8. Pin front facings and facing to garment right sides together inserting button loops between right front facing and edging according to marks. Stitch front facings to edgings and lapels up to cross mark.
9. Process the collar along the outer contour neatly. Insert the collar between the garment and front facings with facing.
Stitch inner collar into jacket neckline, stitch outer collar into front facings'/facing neckline. Press allowances of seams joining inner/outer collars apart, slash rounding.
Turn front facings and facings into wring side.
Pin seams of joining inner/outer collar together. Stitch allowance of seams joining inner/outer collars close to seams. Press hem allowance into wrong side.
10. Press vent one-piece facing and vent allowance into wrong side along bend; topstitch left back detail diagonally at vent top catching vent allowance.
11. Stitch sleeve lengthwise edges excluding elbow vent. Sew sleeve hems by hand. Press vent edges. Stitch lengthwise/upper short cross edges of vent one-piece facing and vent allowance at wrong side. Sew small buttons on sleeves catching vent allowance. Stitch sleeves in, easing them along sleeve caps. Sew pieces of warmer of 4 cm (1-5/8") width under allowances of seams joining sleeves and sleeve caps segments. Sew shoulder pads.
12. Make easy-fitting pleat into lining back part. Press pleat depth leftwards. Stitch lining details as fabric ones leaving 20 cm (8") length slit into sleeve side seam. Lay the lining on the garment right sides together, pin them along back middle line and shoulder seams. Overstitch the garment with lining along front facings and neckline facing. Lay the lining on the garment wrong sides together. Above back part vent: fold the lining under and pin it on vent allowance's facing (right edge). Pull pinned edges right side out and stitch them together. At vent top: fold the lining under and sew it by hand to vent allowance. Press garment hem allowance into wrong side, them sew. Stitch the lining to sleeve hems. Stitch lining to garment hem edge. Turn the garment right side out through slit into sleeve, then stitch slit's edges together.
13. Sew buttons on left front edge.